KJSEmbed is a library for embedding the KJS Javascript (ECMAScript) interpreter in KDE applications. It provides developers with an easy way to allow users to extend application, and can even be used with applications that have not been designed with this in mind thanks to a KParts plugin. In addition, KJSEmbed provides a command line tool for running scripts so users can easily create simple applications of their own in Javascript. KJSEmbed scripts are surprisingly powerful because they access the properties and slots of TQObjects, and can even load widgets and dialogs created with Qt's graphical dialog editor.
To give you an idea of what KJSEmbed provides, here is a brief summary of the more interesting features:
The tquickest way to see what KJSEmbed can do is with kjscmd, a tool for running scripts from the command line. To begin, we'll run kjscmd without any parameters which brings up the KJSEmbed console dialog. The console provides an easy way to run short (one line) scripts, as you can see in figure 1 the scripts have full access to the core Javascript language, and to standard objects such as Math. In addition to the standard Javascript operations, this screenshot also demonstrates the global function print() provided by KJSEmbed.
-- Enter a JS expression and press enter --
kjs> 10+20
30
kjs> print("Hello World!")
Hello World!
undefined
kjs> Math.sin(0)
0
kjs> Math.cos(0)
1
Figure 1: The KJSEmbed Console Dialog
Things get more interesting when you realise that we also have access to the widgets that make up the dialog, as you can in figure 2:
kjs> console
JSConsoleWidget (KJSEmbed::JSConsoleWidget)
kjs> console.childCount()
4
kjs> console.child(1)
CmdEdit (TTQComboBox)
kjs> console.child(2)
RunButton (TTQPushButton)
kjs> console.child("RunButton")
RunButton (TTQPushButton)
kjs> console.child("RunButton").text = "Go!"
Go!
kjs> console.caption = "Different Title"
Different Title
kjs> console.child("Title").hide()
undefined
Figure 2: Modifying the Console Dialog
As you can see, the console dialog has been made available to scripts as the global variable 'console'. We can access the child widgets that make up the dialog either by index using the childCount() and child() methods, or by name using the child() method (you can also use getElementById() if you want a DOM-style API. As well as being able to see the widgets, we can modify them by setting properties - in this example, we modify the caption property of the widget 'console' (changing the window title) and the text property of the widget 'RunButton' (changing the label it displays). Again, there is a DOM-like way to do this - the setAttribute() and getAttribute() methods. For the sake of completeness, the final command illustrates the other way of modifying widgets available to us - it calls hide() slot of the widget 'Title' (what this does is left as an exercise for the reader).
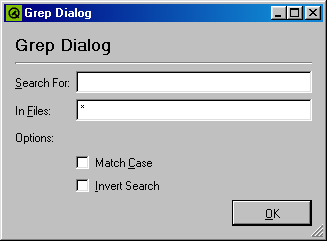
Now that we've seen how to use kjscmd interactively, lets take a look at a more complex example that displays a dialog for running grep. The complete script is shown in listing 1 and as you'll see, is very simple. Loading and displaying the dialog takes only two lines of code because KJSEmbed provides a built-in Factory object that supports Designer files, most of the work is getting the values out of the dialog and building the command line.
// Create and show the dialog
var dlg = Factory.loadui('grepdlg.ui');
dlg.exec();

// Extract the parameters
var search = dlg.child('search_edit').text;
var files = dlg.child('files_edit').text;
var matchcase = dlg.child('case_check').checked;
var invert =  dlg.child('invert_check').checked;

// Build the command line
var options;
if ( matchcase ) {
    options = '-i';
}
if ( invert ) {
    options += ' -v';
}

cmd = 'grep '+options+"'"+search+"' "+files;

// Print the command line
print( cmd );
Listing 1: A Script That Displays the Grep Dialog
In order to find out what the user asked us to search for we need to extract the contents of the various fields in our dialog. We know that the field for entering the text to be searched for is a TTQLineEdit called 'search_edit', so we can use the child() method to get hold of it (this method searches through the children of an object until it finds one with a matching name). Once we've found the right object getting hold of the text is easy because all TQLineEdits make their contents available as a property called 'text'. The code that gets the value of the check boxes is almost identical, except that these are TQCheckBoxes so it's the 'checked' property we're interested in.

Figure 3: The Grep Dialog
When this script is run you'll see a dialog like the one shown in figure 3.
As its name implies KJSEmbed is not just a tool for writing standalone Javascript tools, it also provides facilities for extending existing applications, these facilities being with a KParts plugin for running scripts. The next example uses the plugin to add a simple HTML-to-text action to Kate, the standard KDE editor.
function html2text( html )
{
var text = html.replace( /<[^>]*>/g, '' );
text = text.replace( /"/g, '"' );
text = text.replace( /</g, '<' );
text = text.replace( /&/g, '&' );
return text;
}
function text2html( text )
{
var html = text.replace( /&/g,"&");
html = html.replace( /"/g,""");
html = html.replace( /</g,"<");
return html;
}
The details...
<!DOCTYPE actionset>
<actionset>
<header>
    <name>html2text_actions</name>
    <label>HTML To Text Actions</label>
    <script type="js" src="html2text_plugin.js"></script>
</header>
<action>
    <name>html_to_text</name>
    <type>KAction</type>
    <icons>text</icons>
    <label><text>Convert HTML To Text</text></label>
    <statustext>Converts the selected text from HTML to text.</statustext>
    <script type="js">kpart.selectedText = html2text( kpart.selectedText )</script>
</action>
<action>
    <name>text_to_html</name>
    <type>KAction</type>
    <icons>html</icons>
    <label><text>Quote For HTML</text></label>
    <statustext>Quotes the selected text for inclusion in an HTML document.</statustext>
    <script type="js">kpart.selectedText = text2html( kpart.selectedText )</script>
</action>
</actionset>
The xmlgui:
<!DOCTYPE kpartgui>
<kpartplugin name="html2text_plugin" library="libkjsembedplugin">
<MenuBar>
<Menu name="tools"><Text>&Tools</Text>
<Action name="html_to_text"/>
<Action name="text_to_html"/>
<Action name="jsconsole"/>
</Menu>
</MenuBar>
</kpartplugin>